 Tweet
Tweet
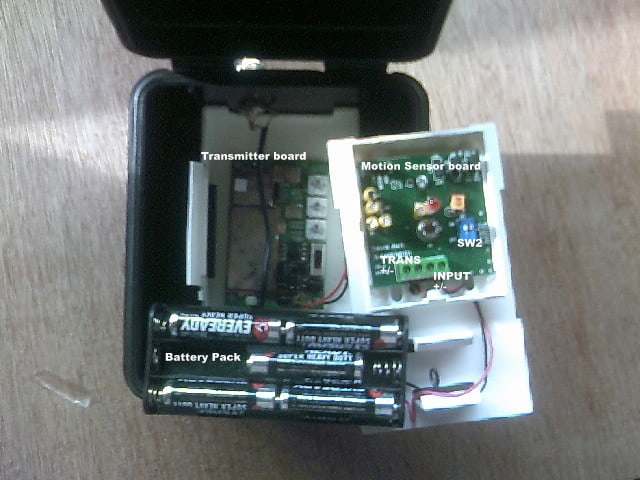
Observations-
1. They are NOT seismic detectors, but alas that ship has sailed. They are probably the next best commercially available product in that price range however.
2. Depending on your location/temperature, you will be changing batteries more frequently. Folks up north are reporting needing to change batts more frequently in colder temps. Down South here, we get on average 2-4 months on a set of batteries per sensor/transmitter.
3. Clear some of the brush in the general vicinity of where you place the sensor. If not strong wind can sometimes blow limbs in front of sensor and trigger false alerts- it's detecting motion after all.
4. If possible, place yours a couple feet above ground and back at least 5 yards from the main focus of where you want to detect.
5. If you cover the "eye" with tape, you can paint the outside of each sensor to match where you are placing it, remember to remove the tape after you paint. Obviously the "eye" cannot be painted. I'll see if I can post a pic.
6. Each sensor is tone coded with 4 possible alert "zones" and other options for tone coding. Possible set ups include staircasing your sensors- i.e, someone first turns off the main road and is picked up on a "Zone 1" alert sensor. They come a little further and are picked up on a "Zone 2" sensor, etc. This is a good way to knowing for sure the motion is coming towards your location.
OR
You can set up "Zones" via the cardinal directions. This is the best way to do it if you are going to run MORE THAN 4 sensors. So you basically pick a number for each direction- i.e, all of "Zone 1" alerts going on the north side, all of "Zone 2" go on the East side, 3 South, 4 West or whatever. Now you can narrow down quickly the direction and general area detection is happening in. This is the best route IME for MORE THAN 4 SENSORS. This also allows you to run as many as you so desire. Their is a point of overkill however :)
Like most perimeter alarms, with a LARGER area to cover, it's best to look for funneling point, lines of drift, etc. and focus on those first before trying to set 500 sensors to cover over square inch. Your fencing can/should be used in this manner also as well as good use of existing topography and land sculpting you can do to improve your situation- removing potential cover or negating it via bulldozing, selective cutting, etc. Course you leave a few "sweet spots" that look great that are purposely covered with sensors and are marked on your sketches and photos of your ground.
I'm not overly great with a soldering iron but I've heard of guys taping into the plastic hard case of the sensors and tying in small solar panels to recharge batteries in the units, tying in IR LEDS so that when a sensor detects at night you can see them with your night vision, etc. I'll just say your limited only by your creativity with this sort of thing ;)
Receivers- get the base station receiver for the house and/or an OP that has regular power (AE system) but also make sure you have some way of monitoring via an HT. Now I will say this, some 2 meter radios sometimes get screwed up at the dealer and somehow get a few things cut inside and can hear this frequency also. I have no idea how the hell that happens but something to be aware of if you buy a used 2 meter ;) So the nice thing about that is that you may not have to carry a second HT. The nice thing about having some sort of HT that will receive these freqs is that you can MOVE AROUND and still get real time detection notification. In other words, you can FLANK them, go out and check out a detection and figure out if they are moving towards you, away from you, still there, etc. (depending how you set things up).

Comment